centos7设置时区,时间+时间同步的三种方式
温馨提示:
本文最后更新于 2023年09月07日,已超过 472 天没有更新。若文章内的图片失效(无法正常加载),请留言反馈或直接联系我。
centos7设置时区,时间+时间同步的三种方式
1.centos7设置时区
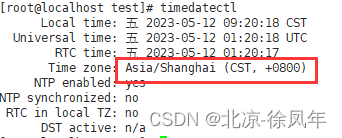
1.1查看当前时区:
timedatectl
1.2查看时间命令:
date

1.3选择时区命令
[root@localhost test]# tzselect
Please identify a location so that time zone rules can be set correctly.
Please select a continent or ocean.
 1) Africa
 2) Americas
 3) Antarctica
 4) Arctic Ocean
 5) Asia
 6) Atlantic Ocean
 7) Australia
 8) Europe
 9) Indian Ocean
10) Pacific Ocean
11) none - I want to specify the time zone using the Posix TZ format.
#? 5
Please select a country.
 1) Afghanistan		  18) Israel		    35) Palestine
 2) Armenia		  19) Japan		    36) Philippines
 3) Azerbaijan		  20) Jordan		    37) Qatar
 4) Bahrain		  21) Kazakhstan	    38) Russia
 5) Bangladesh		  22) Korea (North)	    39) Saudi Arabia
 6) Bhutan		  23) Korea (South)	    40) Singapore
 7) Brunei		  24) Kuwait		    41) Sri Lanka
 8) Cambodia		  25) Kyrgyzstan	    42) Syria
 9) China		  26) Laos		    43) Taiwan
10) Cyprus		  27) Lebanon		    44) Tajikistan
11) East Timor		  28) Macau		    45) Thailand
12) Georgia		  29) Malaysia		    46) Turkmenistan
13) Hong Kong		  30) Mongolia		    47) United Arab Emirates
14) India		  31) Myanmar (Burma)	    48) Uzbekistan
15) Indonesia		  32) Nepal		    49) Vietnam
16) Iran		  33) Oman		    50) Yemen
17) Iraq		  34) Pakistan
#? 9
Please select one of the following time zone regions.
1) Beijing Time
2) Xinjiang Time
#? 1

The following information has been given:

	China
	Beijing Time

Therefore TZ='Asia/Shanghai' will be used.
Local time is now:	Thu May 11 17:50:40 CST 2023.
Universal Time is now:	Thu May 11 09:50:40 UTC 2023.
Is the above information OK?
1) Yes
2) No
#? 1

You can make this change permanent for yourself by appending the line
	TZ='Asia/Shanghai'; export TZ
to the file '.profile' in your home directory; then log out and log in again.

Here is that TZ value again, this time on standard output so that you
can use the /usr/bin/tzselect command in shell scripts:
Asia/Shanghai
设置timezone的时区
sudo timedatectl set-timezone 'Asia/Shanghai'
或者
echo "Asia/Shanghai" > /etc/timezone
2.设置时间
rm -rf /etc/localtime
ln -s /usr/share/zoneinfo/Asia/Shanghai /etc/localtime
3.使用NTP服务时间同步
3.1安装ntp
yum -y install ntp
3.2启动ntp服务
 systemctl start  ntpd
 systemctl enable  ntpd
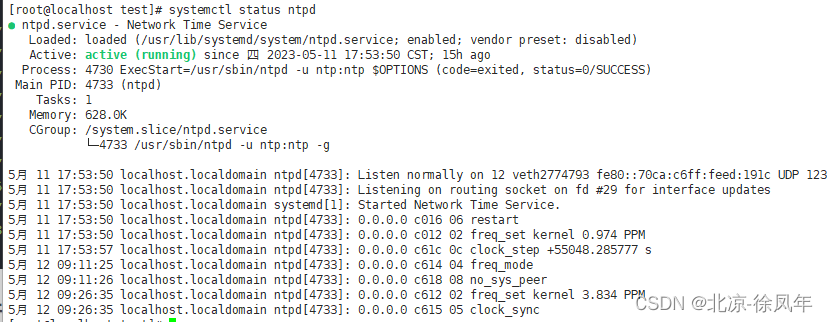
3.3查看ntp服务
systemctl status ntpd
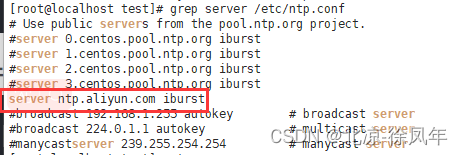
3.4修改ntp.conf文件
vim /etc/ntp.conf
3.5重启服务
systemctl restart ntpd
3.6检查同步状态

3.7执行硬件时间向软件时间同步
hwclock -w
3.8查看当前时间
date
4.使用ntpdate同步
4.1最简单的方法,让所有集群中的主机跟某个时间服务器的 时间同步,执行 ntpdate 时间服务器。
ntpdate ntp1.aliyun.com

不过,这种方法不好.ntpdate同步时间是跳跃的,这将导致文件时间标记,监控数据的紊乱. 而且ntpdate只运行一次就结束,即只同步一次.所以即使我们要写这样写 vi /etc/crontab
* * * * root /usr/sbin/ntpdate ntp1.aliyun.com && /sbin/hwclock -w
4.2执行硬件时间向软件时间同步
hwclock -w
4.3查看时间是否正确
date
5.使用chrony服务时间同步
5.1安装chrony
yum -y install chrony
5.2启动chrony服务
systemctl enable --now chronyd
5.3查看chrony状态
systemctl status chronyd
5.4修改配置文件
grep server /etc/chrony.conf

5.5重启服务
systemctl restart chronyd
5.6检查时间同步状态
chronyc sources
5.7硬件时间向系统时间同步
hwclock -w
5.8查看时间是否正确
date
6.手动修改时间
6.1修改时间方法
date -s "你想设置的时间"
6.2按格式输出时间
date "+%Y-%m-%d %H:%M:%S"
6.3设置时区
timedatectl set-timezone Asia/Shanghai
6.4 查看
timedatectl list-timezones |grep Shanghai
正文到此结束


